Table of Contents
- Key Findings
- Common Drone Gimbal Problem: Symptoms and Causes
- 1. Mechanical Issues (Physical Damage & Misalignment)
- 2. Electrical Issues (Motors & Connections)
- 3. Software & Firmware Issues
- How to Fix DJI Drone Gimbal Without Hassle
- Tools Required
- Steps to Fix a Drone Gimbal
- 1. Power Down and Set Up Your Workspace
- 2. Remove the Top Cover
- 3. Disconnect the Gimbal Cable
- 4. Free the Rubber Mounts
- 5. Replace or Repair Damaged Parts
- 6. Reassemble and Secure the Parts
- 7. Mount the Gimbal Back Inside
- 8. Power On and Test the Gimbal
- What to Expect After Repair (Post-Fix Checks)
- Gimbal Should Move Smoothly
- Clear and Active Camera Feed
- Recalibration Might Still Be Needed
- Test for In-Flight Stability
- No Warning Beeps or Error Codes
- LED Warning Lights
- Common App Warnings
- When NOT to DIY: Signs You Need Professional Repair
- Tell-tale Signs of Serious Damage
- Risks of DIY in Complex Cases
- Link to Trusted Repair Services
- Final Words
- FAQs
- Why is my drone gimbal stuck?
- Does resetting my drone fix gimbal issues?
- What happens if I fly with a broken gimbal?
Your drone’s gimbal just glitched again. Maybe it’s shaking, tilted, or won’t even move. You’re frustrated, unsure if it’s a quick fix or something worse. I’ve been there with my Mini 4 Pro, and that’s when I learnt how to fix DJI drone gimbal.
Now, you can fix a DJI drone gimbal by removing the battery, opening the shell, disconnecting cables, replacing damaged parts like motors or dampers, and then reassembling. Finally, test the gimbal and recalibrate using DJI Assistant 2.
Moving forward, I’ll walk through —
- Common gimbal symptoms and what causes them
- Tools you actually need (nothing extra)
- Step-by-step fixes for mechanical, electrical, and software issues
- How to test your gimbal after repair
- When DIY stops being worth it
Key Findings
- How to Fix: Start by powering down, removing the top shell, and carefully disconnecting the gimbal cable. Replace or repair damaged parts like motors, rubber dampers, or brackets, then reassemble and test before flying.
- Common Issues: Shaky footage, gimbal overload warnings, and calibration errors often stem from torn dampers, burnt motors, misaligned arms, or bad firmware.
- Post-Fix Checks: After repair, confirm smooth gimbal movement, stable video feed, and no error codes. Run a manual calibration (not through the DJI Fly app) if needed.
Common Drone Gimbal Problem: Symptoms and Causes
Before you start fixing your drone gimbal, you should know exactly why your drone gimbal not working. This part helps you spot the issue fast, so you can fix only what’s necessary and avoid wasting money or effort.
| Symptoms | Possible Cause |
| Gimbal not moving at all | Burnt-out motor, power issue, disconnected cable |
| Shaky or unstable footage | Torn rubber dampers, misaligned components |
| Gimbal stuck or jammed | Physical obstruction, damaged bracket or housing |
| Camera tilted or off-center | Calibration issue, bent gimbal arm |
| Gimbal overload warning | Motor strain due to crash or internal short |
| No video feed from the camera | Faulty camera module or damaged transmission cable |
| Gimbal self-test fails during startup | Software conflict or sensor fault |
| Gimbal behaves erratically | Firmware bug or improper cable seating |
If you’re wondering how a gimbal works, it’s basically a system of motors and sensors that keeps the camera steady by compensating for drone movement in real time. So, it’s obvious to encounter several issues, like —
1. Mechanical Issues (Physical Damage & Misalignment)
Even a minor crash or rough landing can cause misalignment or damage to the gimbal’s fragile parts. These mechanical issues often show up through shaking, sticking, or poor stabilization.
- Cracked or broken gimbal bracket: Common after a crash. The yaw bracket or roll arm may need replacement.
- Torn rubber holders: These vibration dampers often rip and can’t properly isolate camera movement.
- Bent camera mount or arms: Can lead to misalignment or crooked video footage.
- Obstruction from leftover packaging foam: Happens with brand-new drones. Double-check that all packaging has been removed from behind the lens or gimbal area.
2. Electrical Issues (Motors & Connections)
When your gimbal doesn’t move at all or emits unusual sounds, it could be dealing with deeper electrical issues.
- Gimbal motor burnout: A damaged motor won’t allow movement and may trigger overload warnings.
- Disconnected or damaged transmission cable: Causes camera failure or erratic gimbal behavior.
- Loose solder points or broken pins: Found on the gimbal board or inside the motor housing, especially after hard impacts.
- Short circuits: May result from improper glue use or torn insulation during DIY repairs.
3. Software & Firmware Issues
Sometimes, the gimbal problem isn’t physical at all, rather it’s digital.
- Incorrect calibration: Especially after part replacements. Results in tilted or misbehaving gimbals.
- Firmware bugs: Outdated firmware can disrupt startup behavior or cause false error codes.
- App syncing issues: Failure to pair properly with DJI Fly or third-party apps can block calibration features.
- Missing factory reset: Sometimes a reset is needed post-repair to restore balance and responsiveness.
How to Fix DJI Drone Gimbal Without Hassle
So let’s walk through the exact steps of how to fix drone gimbal DJI I took. They’re pretty effective at handling mechanical and electrical issues, like damaged mounts, motors, or connection cables.
Tools Required
Before you start, here’s what you’ll want to have on hand. These tools helped me keep things clean and avoid doing more harm than good.
- Small Phillips head screwdriver: For the smaller screws inside the drone
- Torx T5 screwdriver: You’ll need this to open the drone body
- Plastic spudger: Helps you pry open components without scratching or snapping anything
- Tweezers: Super useful for handling delicate connectors and rubber mounts
- Glue gun: For reattaching parts that were heat-sealed
- B7000/T-7000/e6000: Vibration-resistant and reliable for reassembly
- Magnetic mat (optional but recommended): Trust me, it keeps screws from vanishing mid-repair
Steps to Fix a Drone Gimbal
Once you’ve got your setup ready, let’s get into the fix. I’m using the DJI Mini 4 Pro here —
Note: This method works well for issues like a gimbal that won’t rotate smoothly, a shaky camera feed, or parts that feel loose after a crash. I’ve personally used it to replace a roll motor, repair torn dampers, and fix a disconnected transmission cable. If your gimbal is structurally okay but not functioning right, it can likely help.
1. Power Down and Set Up Your Workspace
Remove the battery and place the drone on a static-safe surface.
I use a magnetic mat so I don’t lose any screws. Plus, keep your tools within reach. You’ll thank yourself later!
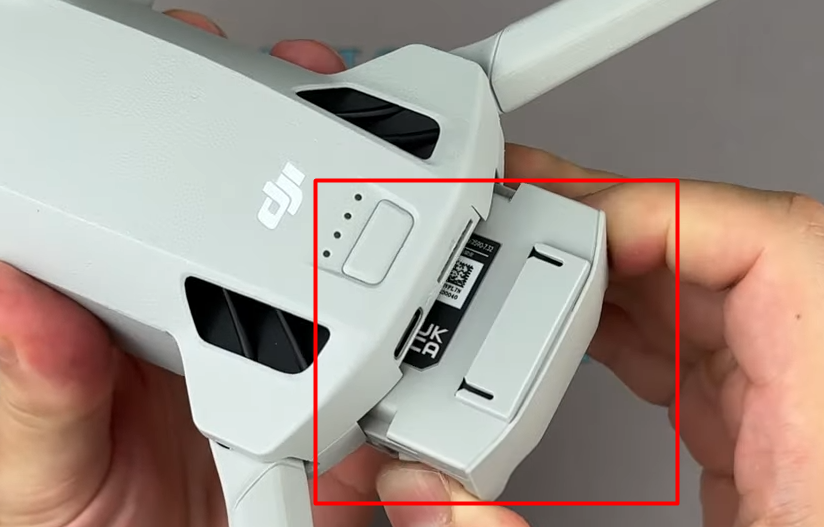
2. Remove the Top Cover
Take your Torx T5 screwdriver and unscrew the four bolts underneath.
Then, gently work your plastic spudger around the edge to lift the top.
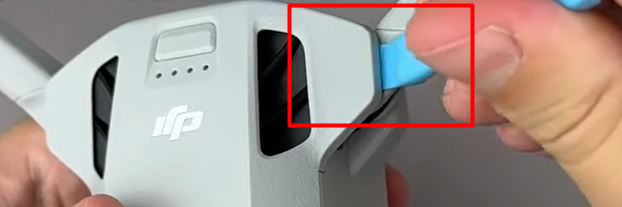
Most importantly, the clips are delicate, so don’t rush this step.
3. Disconnect the Gimbal Cable
You need to disconnect the gimbal’s main transmission cable from the motherboard. Usually, a small metal bracket holds it down.
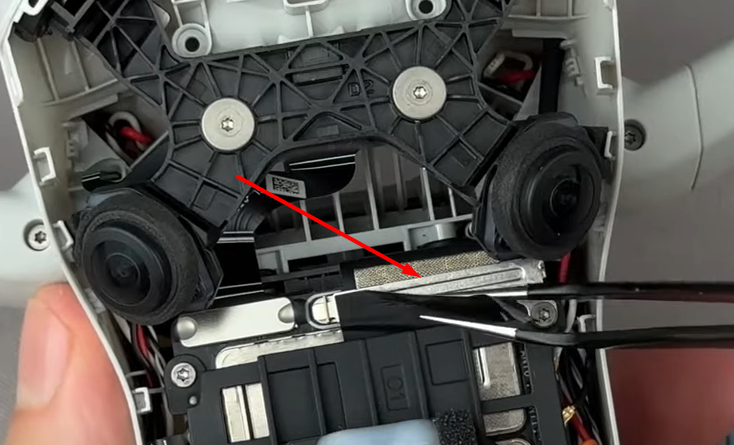
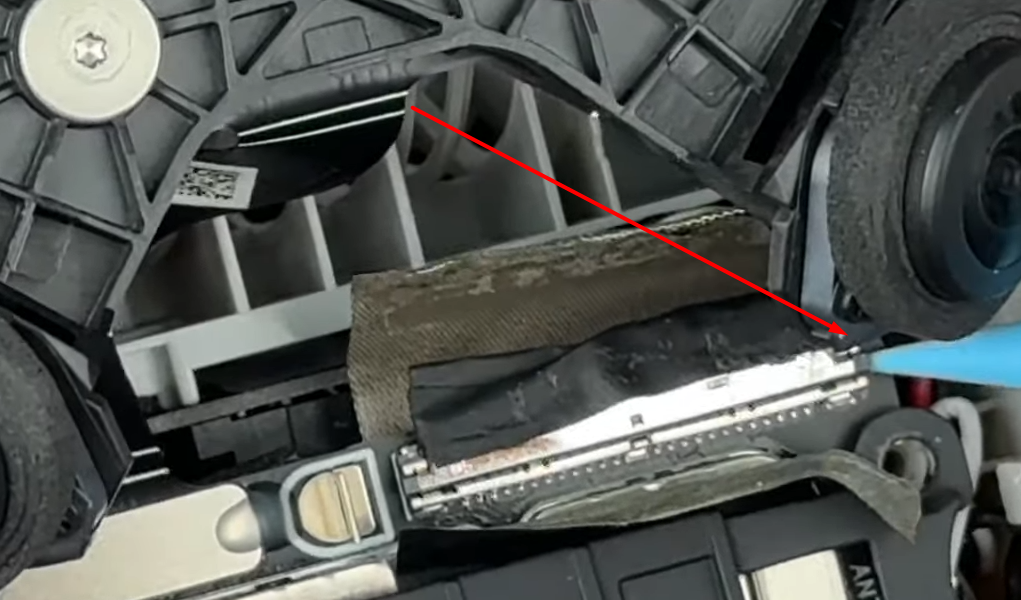
Unscrew it, then use tweezers to peel off the adhesive pad.
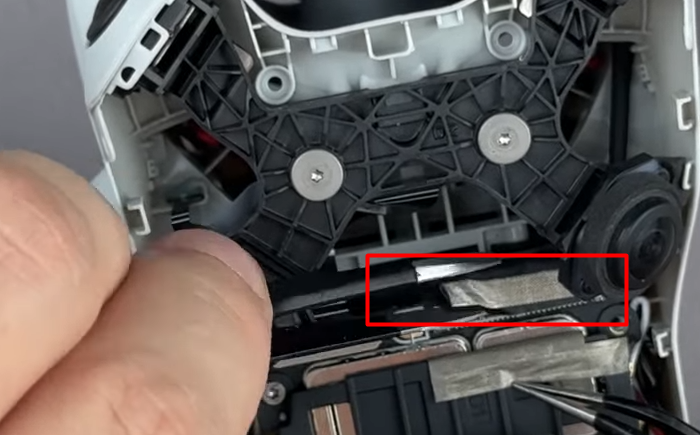
Now, disconnect the cable extremely carefully because that connector is fragile.
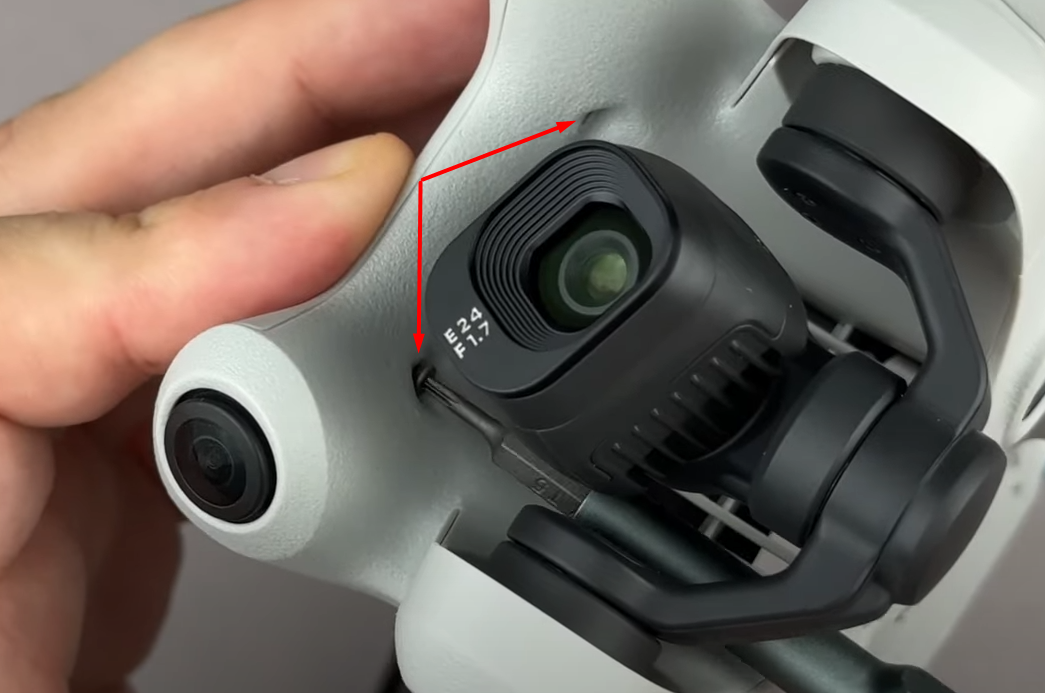
4. Free the Rubber Mounts
You’ll notice rubber dampers holding the gimbal in place.
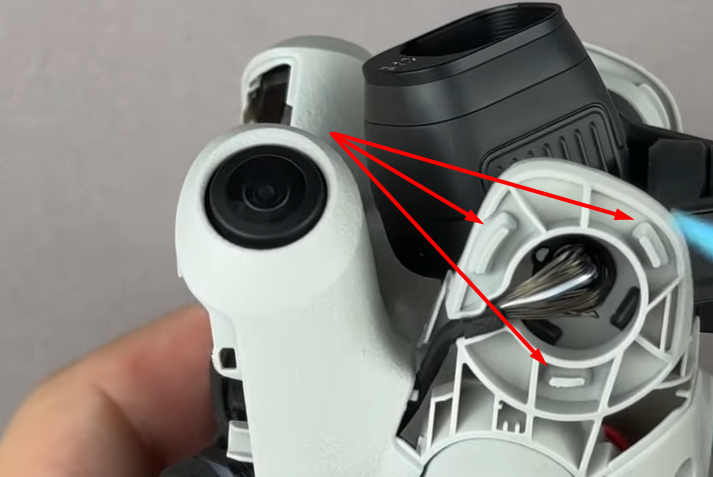
I had to carefully pull them out using tweezers, threading them through the holes in the frame.
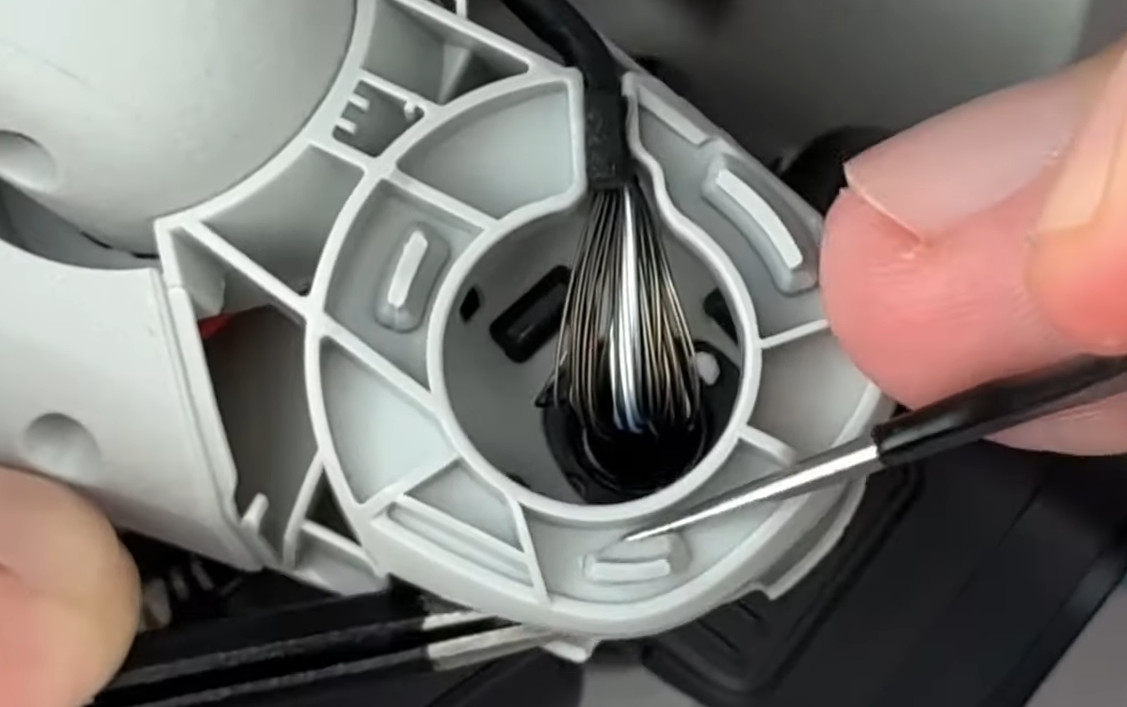
These are often torn if the drone takes a hard landing, but are easy enough to replace.
5. Replace or Repair Damaged Parts
Now, depending on what’s broken, you’ve got two options —
- Replace the entire gimbal assembly, or
- Take it further and swap out specific components, like the camera module, roll motor, yaw motor, or transmission cable.
In my case, I only needed to replace the roll motor, which saved me the hassle of recalibrating everything from scratch.
6. Reassemble and Secure the Parts
Once your new parts are in, start reassembling. I used B7000 glue to secure the connectors and reused the old thermal paste by spreading it evenly under the heatsink.
After that, line up the screw holes and tighten everything gently, avoiding overtightening.
7. Mount the Gimbal Back Inside
Feed the rubber holders back into place. It’s a bit tricky!
I had to push from one side and pull gently with tweezers on the other. Once that’s done, reconnect the cables and pop the top shell back on. On top of that, double-check that everything is aligned before you tighten the final screws.
8. Power On and Test the Gimbal
Now for the moment of truth. Power on the drone, link it with your remote, and check for smooth gimbal movement and a live camera feed.
If things look off, you’ll need to run a manual calibration. However, you don’t do it through the DJI Fly app.
What to Expect After Repair (Post-Fix Checks)
You’ve taken the time to open things up, fix what’s broken, and put it all back together. Now comes the part I never skip and that’s ensuring it actually works before sending it back into the sky.
Gimbal Should Move Smoothly
Once you power up, the gimbal should go through its usual startup motion. It should be clean and steady without any weird noises. If it jitters or stops midway, something’s likely off. It could be a weak motor signal or a ribbon cable that wasn’t seated right.
When I saw no movement at all, I once traced it back to a burned-out motor. Another time, the mount wasn’t reconnected properly.
Clear and Active Camera Feed
Next up, check the live view. You want to see a clear, lag-free image on your screen. If you’re only getting a black screen but the gimbal still moves fine, that usually means your camera module is the issue, not the motors.
If the image is glitchy or freezing, I’ve found the problem to be a half-seated transmission cable. Sometimes it’s even signal interference from nearby wiring that shifted during the repair.
Also, don’t forget to check your firmware version, especially if you’ve swapped out the camera hardware.
Recalibration Might Still Be Needed
If your gimbal’s tilted or not tracking right, don’t panic. You can run a manual gimbal calibration, but not through the DJI Fly app. You’ll need to use a supported calibration tool or third-party utility that works with your model.
Here are a few reliable tools that can help you run a proper manual calibration —
- DJI Assistant 2 (Consumer Series): This is DJI’s desktop software. It works with models like the Mini series, Air, and Mavic. You’ll need a USB-C cable to connect your drone to your computer.
- Drone-Hacks: A third-party firmware tool that offers advanced diagnostics and calibration features. Mostly used by more experienced users.
- GYRO Calibration Tools (via developer options or SDK-based apps): Some power users access this through rooted Android tools or manufacturer-specific utilities.
Important Read:
Test for In-Flight Stability
Hold the drone in your hand and tilt it forward, sideways, and backward. The gimbal should hold its position steady, even if you’re moving the body. If you see the horizon slanting or any vibration, the fix might not be done yet.
Common issues I’ve run into —
- Torn or misplaced rubber dampers
- A yaw arm that wasn’t lined up straight
- Motor output imbalance after rough handling
To be sure, I sometimes record a short test video while walking (drone powered on, not flying).
No Warning Beeps or Error Codes
At startup, your gimbal should hum quietly, and that’s normal. But if you hear grinding, loud beeps, or it stutters, don’t fly yet.
Modern drones like DJI use LED signals and in-app alerts to flag issues —
LED Warning Lights
- Solid or flashing red: Motor overload, blockage, or wiring issue
- Yellow or red/yellow mix: Sensor fault or failed self-check
- Flashing green with no movement: Power’s on, but the gimbal isn’t responding — check the cable
Common App Warnings
- Gimbal motor overload
- Calibration failed
- No gimbal data
- Disconnected
- Stuck
These show up quickly in the DJI Fly app or DJI Assistant 2. If you get any of these after a repair or with a new drone, pause and check the connections.
When NOT to DIY: Signs You Need Professional Repair
Look, I’ve done my fair share of DIY fixes, some successful, others… not so much. There are times when rolling up your sleeves is smart. But there are also moments when it’s better to step back and let a pro handle the job.
If your gimbal’s showing any of the signs below, don’t push it.
Tell-tale Signs of Serious Damage
One of the first red flags I watch for is a burnt smell coming from the drone. It usually means something deeper, like a short circuit. If your gimbal housing looks cracked, bent, or even a little melted, that’s more than surface damage. That’s internal trouble waiting to get worse.
Here are a few other signs I’ve seen that mean it’s time to stop and reassess —
- The gimbal makes rattling noises even when it’s off
- The camera stays totally unresponsive
- You’ve tried to calibrate multiple times, and it keeps failing
- You’re getting persistent error messages even after resets
Risks of DIY in Complex Cases
I love a hands-on fix as much as anyone, but when I tried to replace a gimbal motor without the right gear, I ended up damaging the connector cable.
Here’s what can go wrong if you go too deep without experience —
- You might tear a ribbon cable or damage a tiny sensor
- A single misaligned screw can cause balance or vibration issues
- Messing with internals might lead to firmware glitches
- And worst of all? You could void your warranty just by opening it up
Link to Trusted Repair Services
If you’re at the point where you need help, I always recommend going straight to the source. Most brands, especially DJI, make it pretty easy to get your drone looked at.
And if it’s still under warranty, it might not even cost you anything. Here are a few places I trust —
- DJI Support Center
- Ruko Customer Support
- Official service providers listed on the manufacturer’s website
Before you send your drone in, double-check the warranty terms and what’s covered.
Final Words
I agree that learning how to fix DJI drone gimbal isn’t always easy. However, it’s doable if you take it one step at a time.
Start by identifying the exact issue, whether it’s mechanical, electrical, or software-related. If it’s just a torn damper or misaligned arm, a DIY fix can save you money.
But if you’re facing overload errors, dead motors, or no camera feed, think twice before diving in. Sometimes, it’s smarter to send it in.
FAQs
Why is my drone gimbal stuck?
Your drone gimbal may get stuck due to impact damage, misaligned rubber dampers, jammed motors, or a disconnected cable. Gimbal covers, leftover packaging foam, or calibration errors can also cause restricted movement.
Does resetting my drone fix gimbal issues?
Resetting your drone may resolve minor gimbal issues like software glitches or calibration errors. However, it won’t fix hardware problems such as damaged motors, torn mounts, or faulty cables. They’ll require hands-on repair or part replacement.
What happens if I fly with a broken gimbal?
Flying a drone with a broken gimbal can result in shaky footage, poor camera stability, and loss of control over camera angles. It may also strain internal components, risking further damage or voiding your warranty.

Leave A Reply
Comment submitted successfully!